Roundcubeプラグインの作り方② ~画面のあるプラグイン編~
- 2013/05/15
- uchida
今回は、Roundcubeプラグインとして、画面のあるプラグインの作り方を紹介します。
まず、初めにフォルダ構成は以下のようになります。

ソースの内容は以下のようになります。
sample.php
rc = rcmail::get_instance();

        //ローカライズ対応
        $this->add_texts('localization/');

        //タスクとしてsampleを設定
        $this->register_task('sample');

        //タスクバーにボタンを追加
        $this->add_button(array(
            'command'    => 'sample',
            'label'      => 'sample.sample',
        ), 'taskbar');

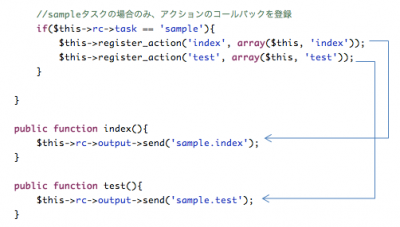
        //sampleタスクの場合のみ、アクションのコールバックを登録
        if($this->rc->task == 'sample'){
            $this->register_action('index', array($this, 'index'));
            $this->register_action('test', array($this, 'test'));
        }

    }

    public function index(){
        $this->rc->output->send('sample.index');
    }

    public function test(){
        $this->rc->output->send('sample.test');
    }

}
index.html
<roundcube:object name="pagetitle" />
test.html
<roundcube:object name="pagetitle" />
ja_JP.inc
この状態でこのように動きます。
初期画面

テスト画面

ここからはソースの説明になります。
①全てのリクエストは、プラグインクラスが受け付けます。
プラグインクラスとは、rcube_pluginを継承したクラスになります。
今回の場合、sampleクラスになります。
②タスクとアクション
Roundcubeにはタスクとアクションの概念があります。
1つのプラグインの中に1つのタスクがあり、複数のアクションがあるイメージになります。
今回の場合は、sampleタスクの中にindexアクションとtestアクションがある状態になります。
例えば、「http://roundcube.com/?_task=sample&_action=test」のようにアクセスすると
タスクはsampleで、アクションはtestという指定で動作します。
「http://roundcube.com/?_task=sample」このようなURLの場合
アクションは何もついていませんので、indexというアクションが自動的に付加されます。
③rcmailオブジェクト
$this->rc = rcmail::get_instance();
Roundcubeの様々な情報を持っているオブジェクトになります。
ここにタスクとアクションの情報も入っていますので、メンバ変数に保持します。
④コールバックの登録
あるアクションが指定されたときに、どのメソッドがコールされるかを登録します。
$this->register_action('index', array($this, 'index'));
この場合はindexというアクションが指定されたら、
$thisの中にあるindexメソッドをコールするという登録方法になります。
⑤テンプレート表示
$this->rc->output->send('sample.index');
上記のように記述することで、sampleタスク内にあるindex.htmlを表示するようにします。


